|
|
TT2 Info | Day 6 | Day 7 | Day 8 | Day 9 | Day 10 | Home | TPSS |
|
Scanning & Saving Pages of a Book for PowerPoint If you are scanning the pages of a book to create a PowerPoint presentation, you need to “tweak” your scanned images a bit to make the PowerPoint presentation run smoother. You want to reduce the physical size of the image and also compress the file size of the image. Chose the set of directions below to match the software you are using either Adobe Photoshop Elements or Paint Shop Pro. Directions for Adobe Photoshop Elements 8 When you scan the page of the book, make sure you scan it at high resolution and save it as a jpeg. 8 Before you pop it into PowerPoint do these things in Adobe Photoshop Elements: : Open Photoshop Elements and then click “File” / “Open” and open your scanned picture. 8 Reduce the physical size of the picture by... : Click "Image" on the top menu bar... then click "Resize" > “Image Size” : Change the pixel size to 800 width and then click "OK" 8 Compress and save by....
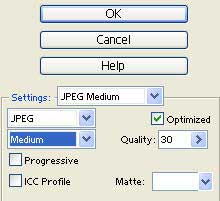
: Click "File".. then "Save for Web" : To the right hand side of the screen change "Settings” to “JPEG Medium” : “Quality setting” should be about 30. : Now click “OK” at the top and choose where you want to save it. : You should make a folder in My Documents that is the name of the book and save to that folder... I usually name the file the page number... For example, if I'm scanning Polar Express, I create a folder in My Documents named “Polar Express” and name the scanned pages "pg1" ... "pg2"... etc. 8 Now you are ready to use that image to insert into your PPT slide. If you are scanning pages of a book to create a PowerPoint presentation, it is important that you own the book itself or you will be breaking copyright permissions.Directions for Paint Shop Pro 8 When you scan the page of the book make sure you scan it at high resolution and save it as a jpeg. 8 Before you pop it into PowerPoint, do these things in Paint Shop Pro: : Open Paint Shop Pro and then click “File” / “Open” and open your scanned picture. 8 Reduce the physical size of the picture by... : Click "Image" on the top menu bar... then click "Resize" : Change the pixel size to 800 width and then click "OK" 8 Compress and save by.... : Click "File".. then "Export"... then "Jpg optimizer" : Under the "Quality" tab set the "Compression Value" to about 20 and click "OK." : Now choose where you want to save it. You should make a folder in My Documents that is the name of the book and save to that folder... I usually name the file the page number... For example, if I'm scanning Polar Express, I create a folder in My Documents named “Polar Express” and name the scanned pages "pg1" ... "pg2"... etc. 8 Now you are ready to use that image to insert into your PPT slide. If you are scanning pages of a book to create a PowerPoint presentation, it is important that you own the book itself or you will be breaking copyright permissions. |
TT2 Info | Day 6 | Day 7 | Day 8 | Day 9 | Day 10 | Home | TPSS
This page was last updated on Thursday, February 03, 2005.