|
|
|
|

To create a document on a half-page with a border around it follow these tips:
 |
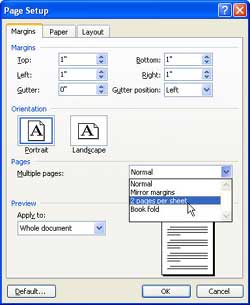
Click [File] then [Page Setup] then click the [Margin] tab at the top of the dialog box. |
|
In Word 2000, the bottom left-hand corner of that box, click to put a check mark in front of [2 pages per sheet] then click [OK]. |
|
In Word XP or Word 2003, under the Margin tab go to the center of the page and Pages: Multiple pages. Click the down pointing arrow and choose 2 pages per sheet.
|
|
If you want the two half-pages to look like those above in the Preview window, have your Paper Size Orientation set to [Portrait].
|
|
Now type your document. The computer will create the second half-page when you get to the bottom of the first. When you are ready to move to the second page, just continue to hit the [Enter] key and your second page will pop up. If you want the same text in both pages, it is best to copy and paste. See the samples in your handout packet.
|
|
If you want the two half-pages to look like those below, have your Paper Size Orientation set to [Landscape].
|

|
Now to put a Border around your Half-page documents, click [Format] then [Borders and Shading] and then click the [Page Border] tab at the top.
|
|
Now click the down pointing arrow next to [Art] at the bottom of the box and choose the Art Border you would like then click [OK].
|
|
HINTS to help with Page Borders. If you have trouble with your Border Art being partially cutoff during printing follow these steps.
|
In the box above, click the [Options] button in the bottom right hand corner under [Apply to: Whole Document]. |
|
In the [Borders and Shading Options] window that pops open, click the down pointing arrow in the [Measure from:] box and click [Text]. |
|
Now click [OK] and [OK]. |
This page was last updated on Sunday, June 19, 2005.
|
|
|
