Formatting the Font - Select the font and choose from the drop down Fonts list - OR - Click "Format" on the top Menu bar and then choose "Font." To get to a font in the list quickly, just type the first letter of the Font's name and it will bring you to those beginning with that letter. Formatting the Font - Select the font and choose from the drop down Fonts list - OR - Click "Format" on the top Menu bar and then choose "Font." To get to a font in the list quickly, just type the first letter of the Font's name and it will bring you to those beginning with that letter.
|
|
|
|
Setting Default Font - Chose the font, style, size, and color you want and click the "Default" button in the bottom left hand corner.
|
Formatting Toolbar 
-or -
- Ctrl+B = Bold
- Ctrl+I = Italics
- Ctrl+U = Underline
- Ctrl+Shift+A = ALL CAPS
- Ctrl+Shift+D = Double Underline
- Ctrl+Shift+K = small caps
- Ctrl+= will make a subscript
- Ctrl+Shift+= will make a superscript
|
Setting Text Size -
- Text must be selected to change the size.
- Most fonts can be sized from 1 to 1638 points.
- 72 point size equals 1 inch high letters.
- You can type any number into the point size box and hit "Enter."
|
|
Changing the CASE of your Text - Shift+F3 -or- Click "Format" on the top Menu bar and click "Change Case."
|
Whip Out the Highlighter -
- Click the highlighter button
 on the Formatting Toolbar and your mouse changes to a highlighter. When you click and drag over the word that you want highlighted, it changes colors. on the Formatting Toolbar and your mouse changes to a highlighter. When you click and drag over the word that you want highlighted, it changes colors.
- To change the yellow highlighter to green, pink, etc. click the downpointing arrow and choose a different color.
- To turn the highlighter off, just click on the icon again or hit the "Escape" key.
- To remove highlighting from text, select the text and click "None" on the highlighter tool.
|
Aligning Paragraphs - Left, Center, Right, or Justified by clicking the icons on the Formatting Toolbar... - or -
- Ctrl+L = Left aligned
- Ctrl+E = Center alignment
- Ctrl+R = Right alignment
- Ctrl+J = Justified (equal on both sides)
- Ctrl+1 = Single space
- Ctrl+2 = Double space
- Ctrl+5 = Makes 1 1/2 space lines
|
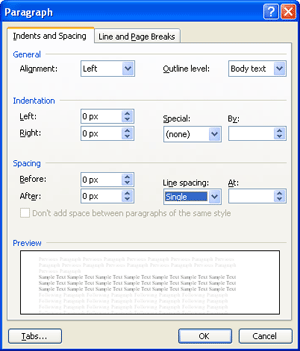
Line Spacing - Click the  icon on the Formatting toolbar or click "Format" on the top Menu bar and "Paragraph" then change the "Line Spacing" from Single, 1.5 spacing, or Double, etc. icon on the Formatting toolbar or click "Format" on the top Menu bar and "Paragraph" then change the "Line Spacing" from Single, 1.5 spacing, or Double, etc.
|
|
|
Indenting Paragraphs
- Click the "Special" drop down menu in the "Indentation" section of the dialog box above and choose .5" for a half inch indentation of your paragraph.
- For Hanging Indents choose "Hanging" under "Special" and look at the Preview window to see what your Hanging Indent looks like. Ctrl+T = Hanging Indent; Ctrl+Shift+T Unhangs the Indent;
- To indent the entire paragraph, select the paragraph and Ctrl+M or click the
 Increase Indent icon on the Formatting Toolbar. Ctrl+Shift+M unindents your paragraph or click the Increase Indent icon on the Formatting Toolbar. Ctrl+Shift+M unindents your paragraph or click the  decrease indent icon on the Formatting toolbar. decrease indent icon on the Formatting toolbar.
|
|
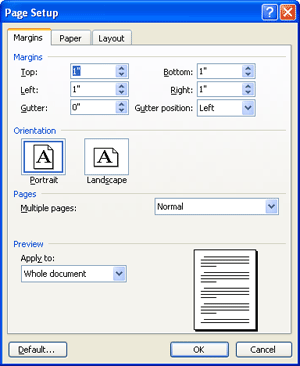
Formatting Pages - Click "File' on the top Menu, then "Page Setup." Here you can set the Orientation, Paper Size, and Margins. Don't forget to click the "Default" button in the bottom left corner to set your Default Margins, etc.
|
|
|
|
Two Pages Per Sheet - Click the down pointing in the "Pages" section of the Page Setup dialog box ... and chose "2 pages per sheet."
|
|
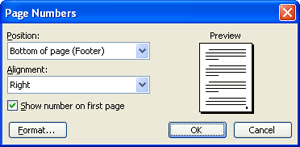
Page Numbering - Click "Insert" on the top Menu bar and then the "Page Numbers" command.
|
|
|
|
If you want to start the page numbering with another number other than 1, click the "Format" button on the bottom left and click "Start at" ... put the number you want to begin with.
|
|
Start a New Page - Ctrl+Enter - or - "Insert" on the top Menu Bar and "Page Break"
|
Headers and Footers - Click "View" then "Headers and Footers"
You can insert date, page numbers, file names, etc. by clicking on the different icons on the toolbar. When finished click "Close."
|
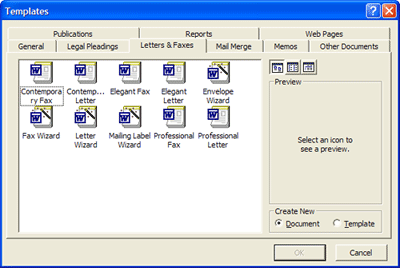
Document Templates - To personalize a document template click "File" and "New" on the top Menu bar and the "New Document Task Pane" will open on the right. Click the "General Template" link and the tab for the kind of document you are interested in.
Open the template and type in the information that will remain the same each time. For ex. Name, address, phone, fax.
|
Then click the downpointing arrow in the "Save as type" box and save it as a document template and rename it with your name, for example, Vicki Fax. This template will be saved under the General Tab in the Template folder on the hard drive of your computer.
|
|
Automatic Numbered Lists - Type the first thing in your numbered list with a 1. in front of it, then hit the "Enter" key and Word will automatically put 2. and continue. To stop the list from automatically number everything else in your document, press the "Enter" key twice.
|
|
Automatic Borders - Type three hypens for a single line border and press "Enter", three equal signs for a double line border and press "Enter', or three underlines for a bolder line and press "Enter".
|
|
|