|
|
Online Tutorials | How To... | Tech Tips | Links | Custom Default Settings
|
| Kidspiration Samples |
Kidspiration Tour |
| Click Here to go to an excellent online tutorial on Kidspiration brought to you from Atomic Learning Library. |
To find the Kidspiration Quick Start online tutorial, find the "Quick Jump" menu at the top and click on the Kidspiration Tutorial link. |
|
|
Kidspiration
Updater
-
This maintenance
release updates
users of
Kidspiration1 to
version 1.0a
which includes
improved Windows
XP installer
compatibility.
|
|
How to Create Kidspiration Activities
- Create the activity in the Picture or Writing View.
- Enable the Teacher Menu and then click "Save as Activity."
- Choose the default settings that you want for the activity.
- Choose the category that you want your activity to appear under, for example "Reading and Writing."
- In the Activity Name box, type a name for your activity.
- In the Description of Activity box, type a description for the activity.
- Now click "Finish."
|
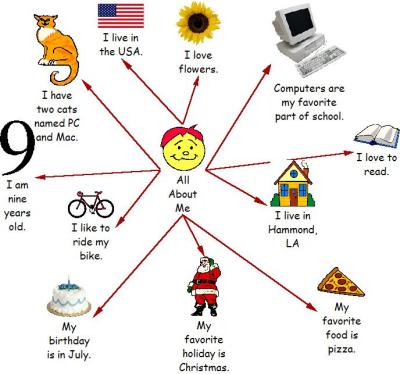
Students can use Kidspiration as a graphical organizer to begin organizing their thoughts for a creative writing assignment about themselves. Once they have the main topics in Picture View, change to Writing View and go through the writing process. Don't forget to print the Picture View along with the Writing View for the Student's Autobiography.
|
How to Modify Kidspiration Activities
- Open the activity that you want to modify and make your changes.
- Enable the Teacher Menu and click "Save as Activity."
- Chose the default settings that you want for the activity.
- Chose the category that you want your activity to appear under, for example "Reading and Writing."
- In the Activity Name box, type a name for your activity.
- In the Description of Activity box, type a description for the activity.
- Now click "Finish.
|
|
 Custom Symbol Library - If you the kids to have their own special symbols to complete an activity, you can create a custom symbol library and then select it as the default library for the activities that you create or modify. Custom Symbol Library - If you the kids to have their own special symbols to complete an activity, you can create a custom symbol library and then select it as the default library for the activities that you create or modify. |
|
If you want to create numbered steps in your Kidspiration activites, use the numbered symbols under Numbers and letters on the Symbol palette. |
How to Create a New Symbol Library
You can import , create, or copy symbols to create your new symbol library. You can also put it under any category on the Symbol toolbar. If you don't choose a category, Kidspiration will automatically store it in the Custom category.
To Create a New Symbol Library:
- Enable the Teacher Menu and click "New Symbol Library".
- In the Category list, click the category that you want the new library to be under on the Symbol toolbar.
- In the Library box, type a name for the new library you have created.
|
Insert Custom Symbols and Graphics in the Symbol Libraries. There are several different ways to do this. You can:
- Insert a symbol or graphic on your picture into a symbol library.
- Insert a graphic file into a symbol library.
- Copy and paste a graphic into a symbol library.
|
Kidspiration TechTips
Diagram Toolbar | Editing Toolbar
|

Diagram Toolbar
|
 Click this to move to the Writing Mode of Kidspiration. Click this to move to the Writing Mode of Kidspiration.
|
 Click this to add a symbol to the page. If you have selected another symbol and then click on this icon, you will create a linked symbol on your page. Click this to add a symbol to the page. If you have selected another symbol and then click on this icon, you will create a linked symbol on your page. |
 Click this to add a link between two symbols. First click the symbol that you want the link to come from... then click the Link Button and not click the symbol that you want the link to go to. Click this to add a link between two symbols. First click the symbol that you want the link to come from... then click the Link Button and not click the symbol that you want the link to go to. |
 The Super Grouper helps the kids practice sorting and categorizing things. When symbols are dragged into the SuperGrouper symbol, they will all move together if the SuperGrouper is moved. The Super Grouper helps the kids practice sorting and categorizing things. When symbols are dragged into the SuperGrouper symbol, they will all move together if the SuperGrouper is moved. |
 Click the Clear button to delete a selected object. This is the same as clicking the Delete Key on your keyboard. Click the Clear button to delete a selected object. This is the same as clicking the Delete Key on your keyboard. |
 Click the Undo Button to undo the last thing you did. You can also click it again and you will Redo that action. Click the Undo Button to undo the last thing you did. You can also click it again and you will Redo that action. |
 Click the Listen tool then click a symbol and you will hear the text read aloud. Click it again to turn off this feature. Click the Listen tool then click a symbol and you will hear the text read aloud. Click it again to turn off this feature. |
 Click this to allow the student to type name, date, or other header information that will be printed at the top of the Kidspiration page. Click this to allow the student to type name, date, or other header information that will be printed at the top of the Kidspiration page. |
|
|
Symbols can be added to Kidspiration document in 3 ways:
- Click and Drag the symbol from the symbol palette to the page.
- Make sure that nothing is selected on the page and then click a symbol on the palette and it will appear on the page.
- Click to select a symbol that you would like to change on your page. Now click a symbol in the symbol palette and it will change.
|

Editing Toolbar
|
Click the Font Style buttons to get bold, italics, underline or different colored fonts.
|

Click the up and down arrows to change the font and the size of
the font.
|

Click a link on a page and then click on the arrow on the Editing Toolbar at the bottom of the screen. This will toggle between 3 options: an arrow at one end, and arrow at both ends, and a line with no arrows.
|
Click a link on a page and then click on the line width tool on the Editing Toolbar. This will toggle between four kinds of lines: a dashed line, a thin line, a medium line, and a thick line.
|
 Click on a symbol on your page and then click the left hand side of this rectangle to change the fill color and the right hand side to change the line color.
|
How to Create Custom Default Settings
Add your own style to your Kidspiration diagrams. If you find yourself making the same changes of color, font, and size over and over, then you need to change the default settings in Kidspiration. To customize the default settings follow the steps below:
- Click "Teacher" on the top Menu bar and then click "Enable Teacher Menu".
- Under the "Teacher" menu, click "Save Default Settings"
- The wizard will walk you through the steps of choosing Default Settings for Picture View Writing View and Settings for Text. Click "Next" after each screen.
- To save your changes click "Finish"
- New projects will now use your Default settings.
|
This page was

|